Workspace, Structure + Film Formats
Learning new software is a hunt for hidden buttons. Let’s find them and set things up right from the start.
This section enables you to
- Reset the workspace and find the panels
- Structure and save your project cleanly
- Create a composition with the right settings
The Workspace
We want everyone’s workspace to look the same, so we reset it to Default. Do this any time your panels end up in strange places.
-
01
Reset your workspace
Windows all over the place? Follow this path.
Window > Workspace > Default ⇧F10
We have different panels for different things:
- Toolbar – on top. Create shape and text layers, move objects and adjust anchor points.
- Project – on the left. Import your files and manage your project’s structure.
- Effect Controls – a tab behind the Project panel. The settings of the effects on your selected layer.
- Composition – in the centre. This is where you preview your animation.
- Effects & Presets – on the right, stacked with other panels. Find your effects here.
- Timeline – at the bottom. This is where you’ll spend most of your time: arranging, cutting and animating.
Structure
A clean structure helps you find your files fast and update projects later. After Effects links files instead of embedding them: the project only stores where your files are.
- motion_design
- aep
- footage
- ai
- psd
- output
- comps
- maincomps
- precomps
- footage
- ai
- audio
- mov
- psd
- Solids
-
01
Build it on disk
Create the folder structure on your disk before you save. If everything stays inside it, you can move the whole folder later.
-
02
Create folders
In the Project panel, Ctrl-click and choose New Folder.
-
03
Sort into categories
Two main folders: comps and footage. Comps split into maincomps and precomps, footage gets one folder per file type.
-
04
Save into aep
Save your project into the aep folder.
⌘⇧S -
05
Date the filename
Save manually every day with the date in front of the name.
20240409_projectname
Film Formats + Compositions
After Effects measures in pixels, because we make video. We work in RGB at 25 frames per second. A composition is your film: it holds the layers and has its own timeline.
-
01
New composition
Use the menu, or Ctrl-click in the empty Project panel.
Composition > New Composition -
02
Name it
Use a descriptive name, no spaces.
motion_design_basics_01 -
03
Set the preset
Leave Square Pixels and set Duration to 10 seconds.
HD · 1920×1080 · 25 fps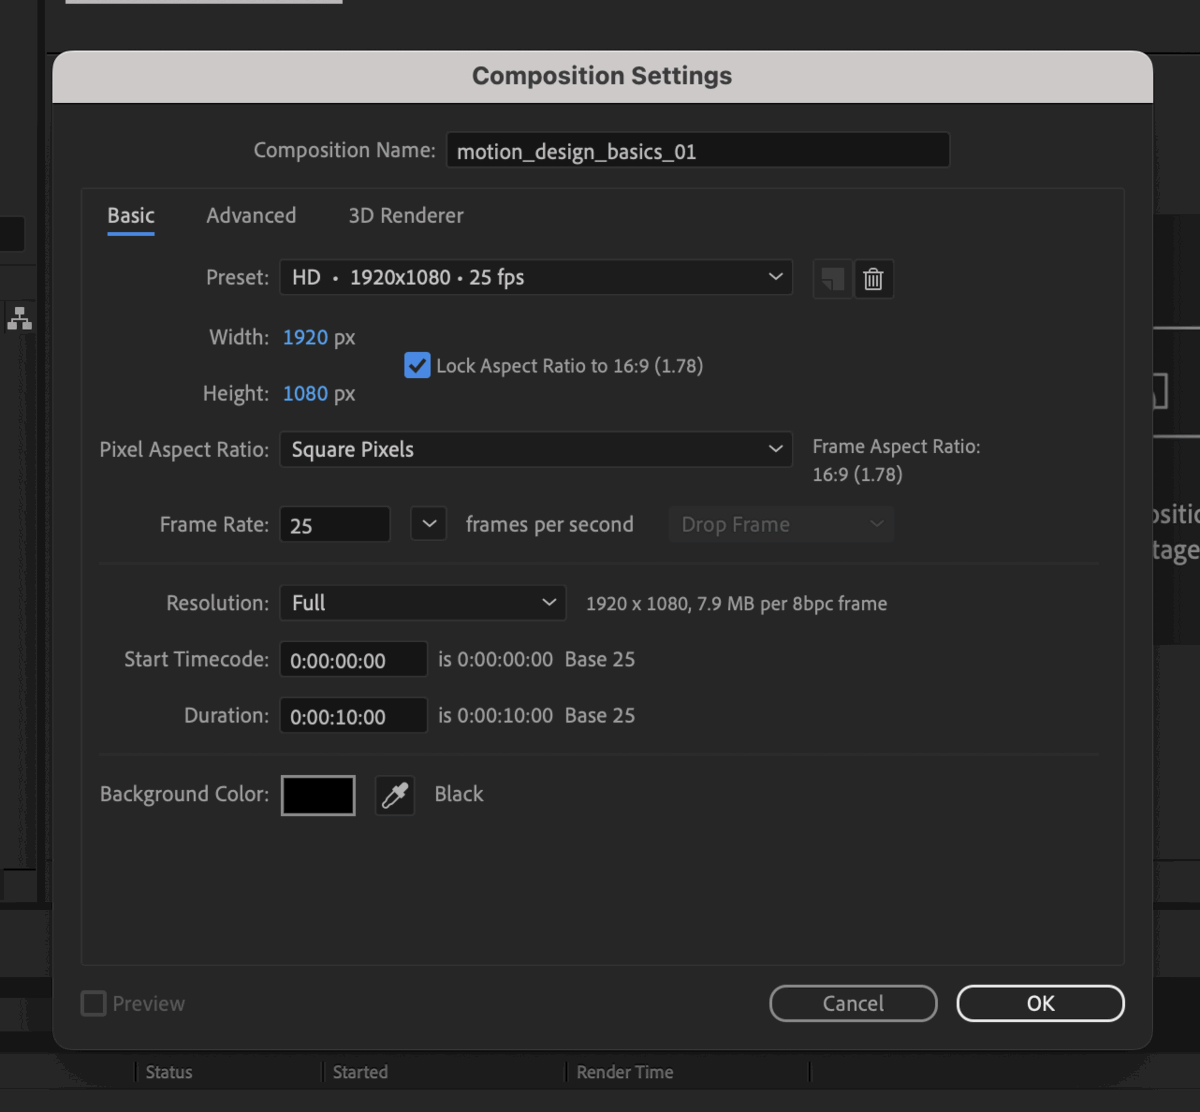
-
04
Open and file it
Double-click the comp (filmstrip icon) to open it in the Timeline. Move it into your comps folder.
Set up your first project
- comps
- maincomps
- motion_design_basics_01
- precomps
- maincomps
- footage
- ai
- psd
Shortcuts
| Action | Mac |
|---|---|
| New Composition | ⌘N |
| Composition Settings | ⌘K |
| Save As | ⌘⇧S |
| Default workspace | ⇧F10 |
More info
- Workspaces, panels and viewers – Adobe After Effects Help
- Composition basics – Adobe After Effects Help
- Social media video specs – Sprout Social